
The Best Way to Increase Footfall at Your Event/Exhibition Booth
If you have ever walked the floor of a busy event, trade show, exhibition, or conference, you will already know the single biggest silent killer of visitor engagement: a dying phone battery. Attendees spend six, eight, sometimes ten hours a day walking between stands, scanning badges, taking photos, checking emails, and coordinating meetings, and by early afternoon, most phones are limping along on 15% battery with the low-power mode warning flashing red. When that happens, visitors stop scanning your literature, stop following you on social media, stop taking photos of your product, and start hunting for the nearest plug socket instead.
This is precisely the gap that a well-planned phone charging locker fills, and it is why more and more exhibitors, event organisers, and brand agencies across the UK are building charging stations directly into their exhibition booth design rather than treating it as an afterthought. Done properly, a phone charging locker is not just a courtesy for tired attendees — it is one of the most effective, low-cost footfall-generating tools available to any exhibitor, sponsor, or venue operator.
This guide is written from an events management perspective, drawing on real installation projects, wall-mounted phone charging lockers built into stand structures, fully branded lockable phone free-standing charging towers, and open, non-locker phone charging stations used by major exhibitors to give you a complete, practical, start-to-finish blueprint for installing a phone charging locker as part of your next exhibition booth build.
Whether you are a stand contractor briefing a client, an in-house marketing team planning your first exhibition presence, or an event organiser looking to add a value-added service across an entire show floor, this article covers everything: the two main types of charging locker hardware, how each is physically installed into a booth structure, how to brand them so they work as a marketing asset rather than just plumbing, the practical planning steps (power, footprint, security, staffing), the pros and cons of locker versus non-locker charging, real-world cost and ROI considerations, and a step-by-step installation checklist you can hand straight to your stand builder.
Table of Contents
- Why Phone Charging station Is a Footfall Strategy, Not Just a Convenience
- Understanding the Two Core Types of Phone Charging Lockers
- Wall-Mounted Phone Charging Lockers: What They Are and How They Work
- Free-Standing Phone Charging Towers: What They Are and How They Work
- Lockable vs. Non-Lockable Phone Charging Stations: Which One Should You Choose?
- Planning Your Phone Charging Station Before the Build Begins
- Step-by-Step: Installing a Wall-Mounted Phone Charging Locker Into Your Booth
- Step-by-Step: Installing a Free-Standing Phone Charging Tower
- Branding Your Phone Charging Locker So It Works as Marketing, Not Just Infrastructure
- Power, Electrics, and Health & Safety Considerations
- Security, Data Protection, and Cable Standards
- Staffing, Signage, and On-the-Day Operations
- Real-World Examples: How Different Brands Have Used Phone Charging Stations
- Cost, ROI, and Justifying the Spend to Stakeholders
- Common Mistakes to Avoid
- Maintenance, Cleaning, and Post-Event Storage
- Choosing a Supplier: Questions to Ask
- Frequently Asked Questions
- Final Checklist
- Event Phone Charging Station
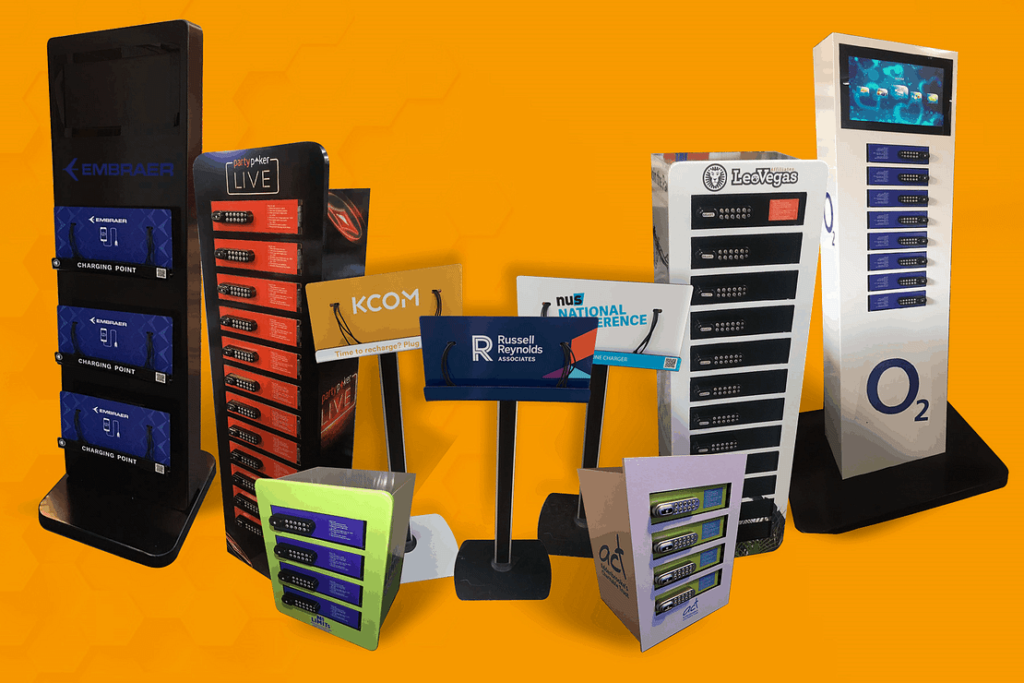
Chargezone Phone Charging stations
1. Why Phone Charging Is a Footfall Strategy, Not Just a Convenience
Before getting into hardware and installation, it is worth being clear about why this matters commercially. Exhibition stand space is expensive. Depending on the show, exhibitors can pay anywhere from a few hundred to several thousand pounds per square metre, before you have even paid for the build, the graphics, the staff, the travel, and the giveaways. Every square metre of that stand needs to earn its keep by generating conversations, leads, and brand recall.
A phone charging locker changes the physics of how long a visitor stays at your stand. Instead of a fleeting thirty-second conversation while someone glances at their watch and worries about their battery, you get five, ten, sometimes twenty minutes of a captive, relaxed visitor standing or sitting at your stand while their phone charges. That dwell time is exactly what good exhibition design has always chased — and a charging point delivers it more reliably than almost any other single feature you can add to a booth.
There is also a compounding effect. Visitors talk. If word spreads around a show floor that “the charging point is over at the such-and-such stand,” you become a destination rather than just another row of pop-up banners. Attendees will actively seek you out, often bringing colleagues or contacts with them, which multiplies your footfall without any extra marketing spend.
Finally, charging stations photograph well. A branded charging tower or wall-mounted locker bank, positioned prominently, becomes an organic backdrop for attendee selfies and casual photos that get shared on LinkedIn and Instagram — earning you impressions well beyond the physical show floor, entirely for free.
In short: a phone charging locker is not a “nice to have” gadget bolted onto a stand. It is a footfall generation strategy, a dwell-time strategy, and a brand visibility strategy, all delivered through one relatively modest piece of equipment.
2. Understanding the Two Core Types of Phone Charging Lockers
Broadly speaking, there are two hardware formats used across UK exhibitions, corporate offices, retail environments, and public venues:
A. Wall-Mounted Phone Charging Lockers
These are recessed or surface-mounted charging locker units designed to be built into a wall, a partition, or a false wall constructed as part of your exhibition stand. Picture a tall, slim panel — often finished in black or a colour matched to your branding — containing a vertical stack of individual lockers, typically ten to twelve compartments, each with its own combination keypad lock and its own charging cable inside.
Each visitor places their phone into an empty locker, closes the door, sets a four-digit PIN code of their own choosing, and walks away to enjoy the rest of the show while their phone charges safely and securely. When they are ready to collect it, they simply re-enter their PIN and the locker releases.
This format is ideal when your exhibition booth includes a permanent or semi-permanent wall structure — for example, a shell scheme back wall, a bespoke timber-framed stand wall, or an internal partition separating a meeting area from the open show floor. The charging locker becomes a functional, integrated feature of that wall rather than a separate piece of furniture taking up valuable floor space.
B. Free-Standing Phone Charging Lockers
These are self-contained, floor-standing units — vertical towers, usually on a weighted or footed base, that house the same style of individual lockers but do not need a wall to be fixed to. They are entirely freestanding, meaning they can be positioned anywhere on your stand: at the entrance to draw people in, in the centre as a focal point, or tucked into a corner as a quiet utility zone.
Free-standing towers are particularly popular when:
- The stand has an open floor plan with no solid back wall (common with island stands or peninsula stands that are open on three or four sides)
- The exhibitor wants the charging station to double as a branded pillar or landmark feature that is visible from a distance across the hall
- The unit needs to be moved between events, reused at multiple shows, or relocated within a venue
- The organiser is providing charging as a centralised, shared service across the whole show floor rather than for one single exhibitor
Both formats — wall-mounted and free-standing — can be finished with a full-height branded fascia, and both can be supplied as fully lockable units or, in the case of some free-standing towers, as an open, non-locker charging bar (more on this in Section 5).
3. Wall-Mounted Phone Charging Lockers: What They Are and How They Work
A wall-mounted charging locker is essentially a slim, vertical steel or aluminium cabinet, typically between 1.2 and 1.8 metres in height, containing a column of individual compartments. Each compartment is roughly the size of a large smartphone with a little extra room for a phone case, and inside each one is a charging cable — commonly a retractable or coiled multi-connector cable that covers Lightning, USB-C, and Micro-USB connections so that virtually any smartphone can be accommodated.
The front face of the unit is where the branding lives. On the units we are describing here, each individual locker door has its own mechanical combination keypad lock, mounted flush or slightly proud of the door. The visitor:
- Opens an available (unlocked, empty) compartment
- Places their phone inside and plugs it into the charging cable
- Closes the door
- Sets their own four-digit PIN code on the keypad
- Re-enters the same PIN to confirm
- Turns the small lever or handle to the locked position
To retrieve the phone, the visitor simply enters the same four-digit code again, and the mechanism releases the door.
This entire unit — the row of lockers — is designed to be installed into a wall cavity or against a solid wall or partition, in much the same way you would install a bank of post boxes, a fuse cupboard, or a serviced access panel. The unit typically has:
- A rigid outer frame (often powder-coated steel or aluminium) that either recesses into the wall depth or sits proud of the wall as a surface-mounted cabinet
- A sub-frame or backing plate that is fixed to the studwork or masonry behind it using appropriate fixings
- Internal wiring looping from a single incoming mains supply to each individual charging point inside
- A discreet ventilation gap or passive cooling channel, since a bank of ten to twelve devices charging simultaneously does generate some heat
When you look at a fully installed wall-mounted unit — the kind you might see recessed flush into a corridor wall in an office building or a hotel — you will notice that the finished look is very clean: a single elegant panel with a neat row of keypad locks, no visible screws, no visible cabling, and a smooth branded fascia running the full height of the unit. That polished, “built-in” appearance is exactly what makes this option so popular for permanent installations and for exhibition stands that already feature a solid wall element in the design.
For an exhibition booth specifically, there are two common ways to physically achieve this look:
Option 1: Recessed into the stand’s own wall structure. If your stand includes a false wall or partition (very common with shell scheme upgrades, bespoke timber stands, and modular systems), the charging locker unit can be recessed directly into that wall during the build, so that only the front fascia and the lockers themselves are visible, flush with the surrounding wall surface. This gives the most seamless, high-end appearance and is the approach used, for example, in the wall-mounted charging locker bank shown fitted flush into a plain painted wall, its black fascia and neat row of keypad locks the only visible features against the surrounding wall finish.
Option 2: Built into a custom wooden frame or surround. If your stand wall is not deep enough to recess the unit, or if you want more creative control over the branding, a bespoke timber or MDF surround can be built around the charging locker, essentially creating a “frame” or feature wall panel that houses the unit. The front of this frame is then branded — vinyl wraps, printed panels, backlit graphics, or painted finishes — so that the charging lockers appear to be a fully integrated, custom-built feature of your stand, rather than an off-the-shelf product bolted on as an afterthought. This is the more flexible option for temporary exhibition builds, since the frame and the locker unit can be built, tested, and branded off-site before being delivered and slotted into position at the venue.
Either way, the finished result should look less like “a phone charging box has been placed in this booth” and more like “this booth was designed around a charging feature from day one” — which is exactly the impression you want to give visitors.
4. Free-Standing Phone Charging Towers: What They Are and How They Work
A free-standing charging tower takes the same core locker mechanism — individual compartments, keypad locks, internal charging cables — and houses it inside a standalone cabinet that does not need to be fixed to a wall. These units typically stand around 1.5 to 1.9 metres tall, with a weighted or wide footed base for stability, and are finished on all visible sides (and sometimes the top) with branding.
Because they are self-supporting, free-standing towers are the natural choice for:
- Island stands and open-plan booths with no solid back wall to recess a unit into
- Roaming or multi-venue use, where the same unit needs to travel between several events in a season
- Centre-of-stand feature pieces, where the tower itself becomes a branded landmark that visitors can spot from across the hall — much like a totem or feature column
- Shared or public-facing installations, such as a sponsor-branded charging point placed in a conference foyer, registration area, or breakout lounge, rather than inside one specific exhibitor’s stand
A well-built free-standing tower typically consists of:
- A base plinth, often on castors or levelling feet, weighted sufficiently to prevent tipping even when visitors are actively opening and closing lockers
- A vertical cabinet body, usually powder-coated or vinyl-wrapped in the sponsor or exhibitor’s brand colours, running the full height of the unit
- The locker bank itself, mounted into the front face of the cabinet, exactly as described in Section 3
- Branding panels covering the remaining visible surfaces — commonly including the sides and the top “header” panel, which is prime real estate for a large, clear logo since it is visible above the heads of the crowd
- In many higher-specification units, an integrated screen mounted above the lockers, used to display sponsor branding, event welcome messages, “How to Use” instructions, or even rotating video content
Some free-standing units are also designed in pairs, positioned side by side to double capacity — a very effective approach for busy events where a single 12-locker tower would create a queue. Pairing two towers together, each finished in matching branding, also creates a more imposing, harder-to-miss visual presence on the show floor, which further reinforces the “destination” effect discussed in Section 1.
A further variant of the free-standing format dispenses with the individual keypad lockers altogether in favour of an open charging bar — several cables mounted onto a branded panel where visitors simply plug in and stand nearby while their phone charges. This non-locker approach is covered in detail in Section 5, because the choice between lockable and non-lockable free-standing units has a real strategic impact on how visitors interact with your stand.
5. Lockable vs. Non-Lockable Charging Stations: Which One Should You Choose?
This is one of the most important decisions you will make when planning a charging installation for an exhibition booth, and it genuinely comes down to what you want the charging point to achieve for your brand.
Lockable Phone Charging Stations
With a lockable unit — whether wall-mounted or free-standing — the visitor places their phone inside an individual, PIN-secured locker and then walks away. This is the right choice when:
- You want to maximise dwell time across the whole event, not just at your stand. Visitors will drop their phone off, then go and explore other exhibitors, attend seminars, grab a coffee, or browse the wider show floor, and come back later to collect it.
- Security and peace of mind are a priority. Visitors are understandably cautious about leaving an expensive smartphone unattended in a busy public space. A lockable unit removes that anxiety entirely, since only the person who set the PIN can open that locker.
- You are operating as a shared, event-wide service rather than a single exhibitor’s marketing tool — for example, an event organiser placing charging lockers in a central atrium as a value-added service for all attendees, sponsored by one or more brands.
- Your stand does not have staff constantly available to watch over unattended devices.
The trade-off with a lockable system is that, because visitors walk away, they are not necessarily standing at your stand while their phone charges. You get the initial “drop-off” interaction and the later “collection” interaction, but the middle period — while the phone actually charges — the visitor is elsewhere on the show floor. That is still valuable (they remember your brand fondly, and they have to walk past or through your stand twice), but it is a different kind of value to what you get from a non-lockable system.
Non-Lockable (Open) Phone Charging Stations
A non-locker charging station is typically a wall-mounted panel or a free-standing bar fitted with a row of charging cables — often coiled or retractable — hanging freely for visitors to plug their device directly into. There is no individual compartment and no PIN lock; the visitor simply connects their phone and stands (or leans, or sits, if a small shelf or stool is provided) at the unit while it charges, then unplugs and takes their phone with them when they are ready.
This is the right choice when:
- You want visitors physically present at your stand for the full duration of the charge. Because there is no locker to walk away from, the visitor has to remain within arm’s reach of their phone the entire time it is charging — typically five to twenty minutes depending on their battery level and the fast-charging capability of the unit.
- You want maximum face time for your sales or brand ambassador team. With the visitor standing right there, at your stand, with nothing much else to do but wait, your team has a golden window to strike up a conversation, demonstrate a product, hand over literature, or simply build rapport — all while the visitor’s attention is not divided.
- You are running a specific activation, product demo, or content screen near the charging point, since a captive audience standing at your stand for several minutes is the perfect opportunity to run video content, live demonstrations, or a scan-to-win competition on a nearby screen.
- Speed and simplicity matter more than security. There is no PIN to remember, no risk of a visitor forgetting their code, and no need for lock mechanisms that require occasional servicing.
The trade-off, of course, is that the visitor cannot leave the immediate area while charging, which limits how many people you can serve per hour compared with a lockable bank (where dozens of visitors can be mid-charge simultaneously across the wider event, freeing up floor space at your specific stand).
Making the Decision
As a general rule of thumb used by experienced exhibition organisers:
- If your core objective is brand visibility across the whole event and goodwill towards your organisation as a helpful, service-minded exhibitor, choose a lockable station — ideally a larger free-standing tower positioned somewhere with high footfall, even if it is not directly inside your own stand footprint.
- If your core objective is lead generation, product demonstration, and direct conversation with visitors at your specific booth, choose a non-lockable, open charging bar directly integrated into your stand design, ideally positioned so your team can naturally engage with anyone standing there.
Many exhibitors, particularly larger brands running flagship stands, choose to run both: a lockable tower near the entrance to draw people in and build broad brand awareness, and a smaller non-locker charging bar within the stand itself, positioned next to a product display or demo area, to convert that footfall into genuine sales conversations.
6. Planning Your Phone Charging Station Before the Build Begins
Before your stand contractor picks up a single tool, there are several planning decisions that will determine how smoothly the charging locker installation goes, and how effective it is once live.
6.1 Define the Objective First
Revisit Section 5 and decide, honestly, what you want the charging station to do for you: broad footfall and goodwill, or focused dwell time and conversation at your own stand. This single decision informs almost every other choice below — locker count, unit type, and placement.
6.2 Choose Wall-Mounted or Free-Standing Based on Your Stand’s Structure
If your stand design already includes a solid back wall, partition, or reception desk structure, a wall-mounted unit recessed or framed into that wall will almost always look cleaner and more integrated than adding a separate free-standing tower. If your stand is open-plan, an island stand, or has no permanent wall element, a free-standing tower is the natural choice.
6.3 Calculate Locker Capacity Against Expected Footfall
A single 8 to 12-locker bank might be more than sufficient for a smaller regional exhibition with a few hundred visitors a day, but it will be quickly overwhelmed at a major national exhibition with tens of thousands of attendees. As a rough planning guide:
- Small local or regional event (under 1,000 daily visitors): one 8 to 12-locker unit
- Mid-sized trade show (1,000–5,000 daily visitors): one or two 12-locker units, or a paired tower set
- Large national exhibition (5,000+ daily visitors): multiple paired towers positioned at different points around the stand or hall, or a combination of lockable towers plus additional non-locker charging bars to spread demand
6.4 Confirm Power Availability With the Venue and Organiser
Every charging locker bank requires a standard mains electrical supply. Confirm with the show organiser or venue’s technical services team, at the earliest possible stage, how much power your stand has been allocated, where the nearest floor box or power drop is located, and whether you need to order an additional supply specifically for the charging unit. This should be arranged weeks, not days, before build-up — power orders at exhibition venues typically have their own lead times and deadlines separate from your general stand booking.
6.5 Plan the Branding Timeline Separately From the Stand Build Timeline
Branded fascias, vinyl wraps, and printed panels for a charging locker or tower need to be designed, proofed, and produced ahead of the show — this is graphic production work that runs on its own timeline, distinct from the physical carpentry or metalwork of the stand build. Build this into your production schedule early so that branded panels arrive at the same time as the stand components, ready to be fitted together during build-up rather than added as a rushed afterthought on the morning of the show.
6.6 Decide Who Owns the Unit After the Show
Will the charging locker or tower be purchased outright and reused at future events, or hired for this specific show? This decision affects budget, storage logistics between events, and how much you invest in bespoke branding versus a more generic finish that can be re-skinned later with new graphics for the next event.
7. Step-by-Step: Installing a Wall-Mounted Phone Charging Locker Into Your Booth
Here is a practical, sequential installation process for a wall-mounted unit, suitable for briefing a stand contractor or AV/electrical subcontractor.
Step 1 — Confirm the wall structure and depth. Before ordering the unit, measure the depth of the stand wall or partition you intend to recess it into. Most wall-mounted charging locker banks require a minimum cavity depth (commonly around 150–200mm, though this varies by model) to sit flush. If your stand wall is shallower than this, plan for a surface-mounted installation or a built-out timber frame instead (see Step 2).
Step 2 — Build or adapt the wall opening. If recessing, frame out a rough opening in the stand’s timber or aluminium sub-frame slightly larger than the unit’s outer casing, leaving room for fixing brackets and cable routing. If surface-mounting within a built timber frame, construct the frame first as a separate module so it can be test-fitted with the locker unit before the stand is fully assembled.
Step 3 — Run the electrical supply to the fixing point. Have a qualified electrician run a single mains cable from your confirmed power drop to the location of the charging unit, terminating in an appropriate isolator switch or socket outlet positioned within the cavity, ready to connect once the unit is fixed in place. This should always be carried out by a certified electrician working to current UK wiring regulations (BS 7671) and, for a temporary exhibition installation, in line with the venue’s own electrical safety requirements.
Step 4 — Fix the unit’s backing plate or frame to the structure. Secure the locker bank’s rear mounting plate or frame to the studwork, noggins, or solid backing within the stand wall, using fixings rated for the weight of the unit (a fully loaded 12-locker bank with cabling can be surprisingly heavy, so do not rely on plasterboard or thin panel alone — always fix back to a solid structural member).
Step 5 — Connect the power supply and test each locker individually. With the unit fixed and wired in, test every single charging port and every keypad lock in turn, using a sample device, before the branded fascia or surrounding panels are fitted. It is far easier to troubleshoot a faulty port or lock at this stage than after the unit is fully enclosed.
Step 6 — Fit the surrounding branded panel or frame. Once the unit is confirmed working, fit the surrounding timber frame, vinyl-wrapped panel, or printed graphic surround, ensuring a neat, flush finish around the edges of the locker bank with no visible gaps, fixings, or cabling.
Step 7 — Final function test and PIN reset check. Run a full end-to-end test: open a locker, set a PIN, close it, walk away, come back, and confirm the same PIN releases the door. Repeat for at least three or four random lockers across the bank, and check that the master reset or override function (used by staff to open any locker left occupied at the end of the show) is working and that the relevant staff member knows how to use it.
Step 8 — Add signage and instructions. Fit a clear, simple “How to Use” instruction panel adjacent to or on the unit itself (many units come with this printed onto each locker door, as shown on the wall-mounted and free-standing units in this guide), and consider a small directional sign nearby if the charging point is not immediately visible from the main aisle.
8. Step-by-Step: Installing a Free-Standing Phone Charging Tower
Step 1 — Confirm floor loading and footprint. Check the venue’s floor loading limits (particularly relevant in older or upper-floor exhibition spaces) and confirm your stand plan allows sufficient footprint for the tower’s base, plus a comfortable standing/queuing area in front of it generally at least a metre of clear space so visitors are not blocking the aisle while using it.
Step 2 — Arrange transport and access. Free-standing towers are usually delivered pre-built or in two or three sections for on-site assembly. Confirm delivery access, lift or ramp availability, and loading bay booking with the venue well ahead of build-up day, since these units are often too tall and heavy to carry through standard doorways without careful planning.
Step 3 — Position and level the base. Move the tower into its final position on the stand, and use the levelling feet or castors (if fitted) to ensure it stands perfectly vertical and stable. Stability is critical visitors will be pulling open and pushing closed multiple lockers throughout the day, and any wobble will be immediately noticeable and off-putting.
Step 4 — Connect power. Run a mains supply from the nearest confirmed power drop to the base of the tower, using appropriately rated cable, cable ramps or covers across any walked area to prevent a trip hazard, and an accessible isolator point for shutting the unit down safely at the end of each show day.
Step 5 — Test all lockers and any integrated screen. As with the wall-mounted unit, test every port and lock individually. If the tower includes an integrated branding screen (as seen on several premium units, displaying a rotating sponsor logo or welcome message), confirm the content is loaded, looping correctly, and set to the right brightness for the venue’s ambient lighting.
Step 6 — Fit any additional branding elements. Attach removable branding panels, header signs, or floor decals around the base if these are supplied separately from the main unit body.
Step 7 — Secure cabling and conduct a walk-round safety check. Confirm there is no trailing cable across a walkway, that the unit is positioned clear of fire exits and clear floor-marking lines required by the venue, and that the unit cannot be easily tipped or rocked by a visitor leaning on it.
Step 8 — Brief your on-site team. Make sure any staff working on or near the stand know how the unit works, know the master override procedure for a locker left occupied at close of show, and know who to call (supplier support line, on-site AV/electrical contractor) if a fault occurs mid-event.
9. Branding Your Phone Charging Locker So It Works as Marketing, Not Just Infrastructure
A phone charging locker that simply exists in beige metal, with no branding at all, still provides a useful service but it does very little for your marketing objectives. To turn the unit into an active brand asset, treat the branding with the same seriousness as any other piece of stand graphics.
Full-height fascia branding. The most common and highest-impact approach is a full-height vinyl wrap or printed panel covering the entire front, sides, and (on free-standing towers) the top header panel of the unit, in your brand colours, with your logo positioned clearly above the lockers themselves — exactly the approach seen in examples where a deep blue brand colour and bold logo run the full height of a paired charging tower installation, making the units instantly recognisable from across a car park or hall, well before anyone is close enough to read the smaller instructional text.
Recessed or framed wall installations. For a wall-mounted unit built into a timber surround, the branding opportunity extends to the frame itself — a printed graphic panel, a painted finish matching your stand’s colour palette, or even a lit acrylic surround can transform a purely functional locker bank into a genuine design feature of your stand, in the way a bespoke framed installation can carry a clean corporate identity across the surrounding panel while the lockers themselves remain functional and understated.
Integrated screens for message and content. Where a unit includes a built-in screen above the lockers, this is valuable real estate for rotating content: your logo, a welcome message, key statistics, a product video, or a QR code linking to a landing page, competition, or sign-up form — turning idle “waiting” time at the tower into an active marketing touchpoint, in the way a large branded screen positioned above a locker bank immediately communicates whose stand this is and reinforces brand identity to everyone passing by, well before they reach the lockers themselves.
Instructional messaging as a branding opportunity. Even the practical “How to Use” instructions on each locker door or charging point can be styled in your brand’s tone of voice and typography rather than left as generic supplier text, reinforcing brand consistency down to the smallest detail.
Clear call-to-action messaging for open charging bars. For non-lockable, open charging installations, simple, bold strip messaging directly beneath the cables — such as a clear instruction band immediately below each cable — is highly effective, since it tells visitors exactly what to do at a glance, without needing to read a longer instruction panel, and can double as a branding strip in a distinct colour associated with your campaign.
Consistency with the rest of your stand. Whatever finish you choose, ensure the charging unit’s colours, typography, and logo placement are consistent with the rest of your exhibition stand and any wider campaign creative being used at the show, so the charging point reads as a natural extension of your stand rather than a mismatched add-on.
10. Power, Electrics, and Health & Safety Considerations
Every phone charging installation, however small, is an electrical installation, and should be treated with the same rigour as any other powered element of your exhibition stand.
- Use a qualified, insured electrician for all connections, and request a copy of their test certificate for your event’s health and safety file. Most UK exhibition venues will require this as part of your stand’s risk assessment and method statement (RAMS) submission before build-up.
- Confirm the unit’s power draw with your supplier in advance (typically modest per port, but multiplied across ten to twelve simultaneous charges it adds up) and check this against the power allocation you have booked with the venue or organiser.
- Avoid daisy-chaining multiple extension leads. Run a single, correctly rated supply cable directly to the unit’s isolator or inlet point.
- Manage cable routes carefully, using cable ramps or covers across any area walked by visitors or staff, and avoid routing cables across fire exit routes or accessibility paths.
- Fit an accessible isolator switch so the unit can be safely powered down at the end of each show day and safely powered back up the following morning, without needing to access internal wiring.
- Include the unit in your stand’s daily safety walk-round, checking for any damaged sockets, worn cables, or loose panels before doors open each day.
- Position the unit clear of fire exits, escape routes, and any area the venue has marked as a clear zone, and confirm this position with the organiser’s operations team during your stand plan approval process.
11. Security, Data Protection, and Cable Standards
Because visitors are placing their own personal devices into your charging equipment, a small amount of thought given to security and trust pays off considerably.
- PIN reliability. For lockable units, make sure your team understands the master override procedure in case a visitor forgets their PIN or a locker sticks, and keep this process discreet and professional rather than something visitors overhear repeatedly throughout the day.
- Cable compatibility. Choose units fitted with multi-connector cables (commonly covering Lightning, USB-C, and Micro-USB) so that the widest possible range of devices can be accommodated without visitors needing to bring their own cable.
- No data risk. Charging-only cables and units (rather than full USB data-sync connections) reduce any concern from security-conscious visitors about data being accessed while their device is connected — this is worth confirming with your supplier and can be a reassuring point to include on your instructional signage for corporate or government-sector events where attendees may be more cautious about plugging devices into unfamiliar equipment.
- End-of-day sweep. At the close of each show day, have a staff member check that no lockers remain occupied and no devices have been left in an open charging bay, and store any unclaimed devices securely with your stand or event’s lost property process overnight.
- Insurance. Confirm with your exhibition insurance provider or the venue whether any additional liability cover is needed for a charging station handling third-party devices — in most cases standard exhibitor public liability cover is sufficient, but it is worth a quick confirmation call rather than assuming.
12. Staffing, Signage, and On-the-Day Operations
A charging station works best when it is actively supported, not simply left to run itself in the corner of your stand.
- Brief your stand team on how the unit works so they can confidently help a visitor who is unfamiliar with the keypad system or unsure how to select the correct charging cable.
- Use the charging point as a natural conversation opener. Train your team to approach visitors waiting at a non-locker charging bar with a simple, friendly opening line, rather than leaving them standing in silence for the full charging period — this is the single biggest way to convert dwell time into a genuine lead or conversation.
- Signpost clearly from the main aisle. If your charging point is not immediately visible from the primary walkway, use a simple directional sign or floor decal reading something like “Free Phone Charging This Way” with an arrow, since this single piece of signage can meaningfully increase footfall on its own.
- Consider a small seating area next to a non-locker charging bar, if space allows, since a visitor who is comfortable is more likely to stay engaged in conversation for the full charging period rather than standing awkwardly and cutting the interaction short.
- Keep a visible queue-management approach for busy periods — a simple “please take a locker” sign, or a team member gently directing traffic, prevents frustration if all lockers are occupied during a peak rush.
13. Real-World Examples: How Different Brands Have Used Charging Stations
To make this guide practical rather than purely theoretical, it is worth looking at a few real patterns seen across recent UK installations.
A corporate investment brand’s paired free-standing towers. A financial services brand deployed two matching free-standing charging towers, each holding twelve lockers, finished in the brand’s signature deep blue with bold white branding running the full height of both units and a clear “Free, Fast Charging” headline visible from a distance. Positioning two units side by side, rather than one larger single unit, doubled capacity for a busy corporate event while creating a more imposing, hard-to-miss visual landmark, reinforcing the message of a modern, service-led brand right from the moment attendees arrived.
A global mining and resources company’s screen-integrated towers. Another organisation used free-standing towers with an integrated screen mounted above an eight-locker bank, displaying the company logo prominently to anyone approaching, with the lockers themselves kept in a clean, understated black-and-white finish beneath. This approach prioritises brand visibility from a distance (via the large illuminated screen) while keeping the functional locker area calm and easy to use.
An e-commerce marketplace’s open, non-locker charging bar. A well-known online marketplace brand used a striking black free-standing unit with an integrated screen at the top and three tiers of open (non-locker) charging cables beneath, each tier labelled with a bold, colour-coded “Charge Your Phone Here” strip. Because there was no locker to walk away from, visitors stood directly at the unit for the full charging period — precisely the kind of guaranteed face-time and dwell-time discussed in Section 5, ideal for a brand focused on direct engagement and brand messaging via the screen rather than pure convenience.
A wall-mounted installation in a corporate or public building setting. A simple, elegant example of the wall-mounted format shows a slim black locker bank recessed flush into a plain wall, with a neat vertical row of ten to twelve keypad-locked compartments and no additional external branding beyond the unit’s own natural finish — demonstrating how understated and architecturally clean this format can look when recessed properly into a wall structure, which is exactly the finish worth aiming for if your exhibition stand includes a solid partition wall you want to keep visually minimal while still offering full charging functionality.
The common thread across all of these examples is intentionality: in every case, the charging station was designed as a considered part of the overall stand or environment, branded consistently, and positioned to serve a specific strategic purpose — whether that was raw visual impact from a distance, sustained visitor engagement, or clean architectural integration.
14. Cost, ROI, and Justifying the Spend to Stakeholders
For anyone needing to justify this line item in an exhibition budget, it helps to frame the investment in terms stakeholders already understand: cost per lead, cost per square metre, and cost per hour of engaged attention.
- Compare against traditional footfall drivers. A branded charging station is often significantly cheaper than a full interactive activation, a competition prize fund, or a celebrity appearance, yet frequently delivers comparable or superior dwell-time results, because it solves a genuine, universal need (a dying phone battery) rather than relying on novelty alone.
- Factor in reuse across multiple events. A purchased (rather than hired) unit, particularly a free-standing tower with a neutral base finish and a replaceable branded wrap, can be reused across an entire season of events, spreading the initial cost across many shows and dramatically improving the cost-per-event calculation over time.
- Quantify dwell time uplift. Even a conservative estimate — say, an extra five to eight minutes of engaged attention per visitor who uses the station — represents a meaningful increase over the typical fifteen-to-thirty-second interaction many exhibitors get from casual passers-by, and this uplift is straightforward to communicate to stakeholders in a simple before-and-after comparison.
- Track usage as a concrete metric. Many organisers and exhibitors log approximate daily usage (number of lockers used, number of charges completed) as a simple, tangible metric to report back to stakeholders after the event, alongside the more traditional lead count and stand traffic figures.
- Consider co-sponsorship. For larger events, charging stations are sometimes co-funded by an event organiser (who wants a value-added attendee service) and a headline sponsor (who wants the branding rights) — a cost-sharing model well worth exploring if budget is tight.
15. Common Mistakes to Avoid
- Ordering the unit too late. Charging lockers, particularly bespoke-branded ones, often need several weeks of lead time for manufacture, branding production, and delivery scheduling. Treat this as a long-lead item in your build programme, not a last-minute add-on.
- Failing to confirm power in advance. A beautifully branded charging tower with no confirmed power supply on the day is a wasted investment and a visible embarrassment on your stand. Confirm power requirements with the venue in writing, well ahead of the show.
- Choosing the wrong format for your objective. As covered in Section 5, picking a lockable unit when your real goal was sustained visitor engagement (or vice versa) undermines the whole point of the installation. Be clear on your objective before ordering.
- Under-branding the unit. A charging station with no visible branding is a missed opportunity — visitors will use it, benefit from it, and remember almost nothing about who provided it.
- Under-sizing capacity for a large event. A single small locker bank at a major national exhibition will be permanently full by mid-morning, creating frustration rather than goodwill. Size the installation to genuine expected footfall.
- Ignoring accessibility. Position units at a height and in a location accessible to wheelchair users and visitors of varying heights, and ensure any queuing area does not obstruct accessible routes.
- Forgetting staff briefing. An unstaffed, unexplained charging unit will still get used, but you lose the conversation and engagement opportunity that makes the investment worthwhile in the first place.
- Neglecting the end-of-show device sweep. Leaving devices locked or unclaimed overnight, or failing to check the unit before it is packed away, creates unnecessary stress for visitors and potential loss or damage claims.
16. Maintenance, Cleaning, and Post-Event Storage
If you intend to reuse your charging station across multiple events (which, as discussed in Section 14, is where the strongest ROI case lies), build a simple maintenance routine into your standard post-show teardown process:
- Wipe down and disinfect all cable connectors and locker interiors after each event, given the volume of hand contact the unit receives throughout a show.
- Check and re-tighten any cable connectors or keypad mechanisms that have seen heavy daily use.
- Inspect the branded wrap or panel for any peeling, scuffing, or damage sustained during the show or during transport, and schedule any reprinting well ahead of the next booking.
- Store the unit in a dry, temperature-stable environment between events, ideally in its original transport case or a purpose-built flight case if one was supplied.
- Keep a simple maintenance log noting any faults, repairs, or replacement parts used, so recurring issues can be identified and addressed with your supplier.
17. Choosing a Supplier: Questions to Ask
When briefing potential suppliers for a wall-mounted or free-standing phone charging locker, a short, focused set of questions will help you compare options fairly:
- What locker capacities are available, and can units be paired or linked for larger events?
- What is the minimum wall cavity depth required for a recessed, flush wall-mounted installation, and is a surface-mounted or framed alternative available if our stand wall is shallower?
- Can the unit be supplied with a full custom branding wrap, and what is the production lead time for bespoke graphics?
- What connector types are included inside each locker or charging bay, and do they cover the main Lightning, USB-C, and Micro-USB standards?
- Is the unit available in both lockable and non-lockable (open charging bar) configurations?
- What power supply does the unit require, and what is the total load if all lockers are charging simultaneously?
- What is the lead time from order to delivery, including any bespoke branding production?
- Is delivery, installation, and on-site testing included, or will this need to be coordinated separately with our own stand contractor?
- What is the process for a forgotten PIN or a stuck locker during the event, and is a support contact available during show hours?
- Is the unit available to purchase outright for repeated reuse across multiple events, and what is the expected lifespan of the locking mechanisms under heavy daily use?
18. Frequently Asked Questions
Do phone charging lockers work with all phone models? Most modern units include multi-connector cables covering the three dominant standards (Lightning, USB-C, and Micro-USB), which between them cover the overwhelming majority of smartphones in current use. It is worth confirming this directly with your supplier if your event audience is likely to include a high proportion of older devices.
How long does it take to install a wall-mounted unit into an exhibition stand? For a straightforward recessed installation into an already-framed stand wall, physical fitting typically takes a few hours once the wall opening and electrical supply are prepared in advance. The electrical connection and full function testing should be allowed for as a separate, additional stage, and bespoke branded surrounds may add further time depending on complexity.
Can a free-standing charging tower be moved once it is set up on the stand? Once positioned, levelled, and connected to power, a free-standing tower is not designed to be casually moved during a live event, both for stability and cable-safety reasons. If repositioning is needed, power should be isolated first and the move treated as a mini reinstallation rather than simply pushing the unit across the floor.
Is a locker system more secure than an open charging bar? Yes — because each locker is individually PIN-secured, a visitor’s device is protected from anyone else accessing it while charging, which is not the case with an open, non-locker charging bar where the device remains unattended in the visitor’s own hands or field of view rather than genuinely locked away.
Which option is better for lead generation: locker or non-locker? As covered in Section 5, a non-locker, open charging bar generally produces stronger direct engagement opportunities, since the visitor must remain at your stand for the full charging period, giving your team a natural window for conversation. A lockable unit produces broader footfall and goodwill benefits across the wider event, since visitors circulate elsewhere while their phone charges.
Can charging lockers be branded to match our exhibition stand exactly? Yes — both wall-mounted and free-standing units can be finished with full custom branding, from vinyl wraps and printed panels to bespoke timber surrounds and integrated screens, allowing the unit to be matched precisely to your stand’s colour palette, typography, and overall design.
How much power does a charging locker installation need? This varies by unit and manufacturer, but as a general planning principle, always confirm the exact power draw with your supplier and cross-check this against the power allocation booked with your venue or event organiser well ahead of the show, since under-ordering power is one of the most common and easily avoided planning mistakes.
19. Final Checklist
Use this as a quick pre-show reference, working backwards from build-up day:
- Objective defined: broad footfall/goodwill vs. focused lead generation and dwell time
- Format chosen: wall-mounted or free-standing
- Locker type chosen: lockable or non-lockable, based on the objective above
- Capacity confirmed against expected daily footfall
- Power requirement confirmed and ordered with the venue/organiser
- Branding brief issued and artwork approved with sufficient production lead time
- Delivery, access, and loading logistics confirmed with the venue
- Qualified electrician booked for on-site connection and testing
- Wall opening or floor position confirmed and prepared ahead of build-up
- Full function test completed (every locker, every port, every PIN cycle) before doors open
- Signage and instructional panels fitted and clearly visible
- Staff briefed on operation, PIN override procedure, and engagement approach
- End-of-day sweep and isolator shutdown procedure agreed with the team
- Post-show maintenance and storage plan in place if the unit is being reused
20. Event Phone Charging Station
A phone charging locker, whether recessed elegantly into the wall of your exhibition stand or standing proudly as a fully branded floor tower at the entrance to your booth, is one of the most reliable, cost-effective footfall and dwell-time tools available to any exhibitor. It solves a genuine, universal problem that every visitor to every event shares, it gives your brand a natural reason to be remembered fondly, and — when the lockable and non-lockable formats are chosen deliberately, in line with your real marketing objective — it can be tuned precisely to deliver either broad event-wide brand visibility or focused, high-value conversations at your own stand.
The technical side of installation, whether a wall-mounted recess, a bespoke timber surround, or a free-standing branded tower, is entirely manageable within a normal exhibition build programme, provided power, branding production, and delivery logistics are planned early rather than left as an afterthought. Get those fundamentals right, brand the unit properly, brief your team to use the resulting dwell time well, and a phone charging locker will consistently be one of the best-performing, best-value features on your entire exhibition stand.
If you are planning your next exhibition and want to explore which format — wall-mounted or free-standing, lockable or open — best suits your stand, your audience, and your objectives, it is worth discussing your specific floor plan, expected footfall, and branding requirements with your stand contractor or charging station supplier as early as possible in your planning process.
21. Comparing Wall-Mounted Phone Charging Station and Free-Standing Phone Charging Station Options Side by Side
Because the choice between a wall-mounted locker bank and a free-standing tower is often the very first decision an event manager needs to make, it is worth laying the two options out side by side in plain terms.
| Consideration | Wall-Mounted Locker | Free-Standing Tower |
|---|---|---|
| Best suited to | Stands with an existing solid wall, partition, or shell scheme back wall | Island stands, open-plan booths, or stands with no fixed wall element |
| Visual finish | Clean, recessed, architecturally integrated look | Bold, freestanding landmark visible from across the hall |
| Portability between events | Fixed to the stand structure; not designed to move | Fully portable; can be relocated between events or within a venue |
| Floor space impact | None beyond the wall thickness | Requires dedicated floor footprint plus queuing space |
| Branding surfaces available | Front fascia and surrounding frame | Front, sides, and top header panel, often visible from a distance |
| Typical use case | Corporate stands, reception areas, permanent or semi-permanent installations | Trade shows, exhibitions, conferences, roaming brand activations |
| Install complexity | Requires wall opening, backing plate, and recess or frame build | Requires floor space, levelling, and stable base positioning |
Neither format is inherently “better” — the right choice always comes back to your stand’s physical layout and your marketing objective, as set out earlier in this guide.
22. Making the Charging Station Part of Your Wider Event Marketing Story
A well-branded charging point does not need to sit in isolation from the rest of your event marketing activity. Some of the most effective exhibitors treat the charging station as a genuine content and campaign touchpoint, not just a piece of stand furniture.
Pre-event promotion. Mention the charging station in your pre-show email campaigns, event app listings, and social media posts inviting visitors to your stand — “Come and charge your phone with us” is a simple, practical, non-salesy reason for a visitor to seek you out, and it works especially well alongside a stand number and a short description of what else they will find there.
On-the-day content. Encourage visitors using the charging point to take a photo or short video, particularly if the unit includes an eye-catching branded screen or a distinctive colour scheme, and consider a simple, low-pressure prompt on the signage inviting them to tag your brand if they share it.
Post-event reporting. Approximate daily usage figures, photographs of the installed unit, and any feedback gathered from visitors while they waited at the station are all useful, tangible assets for your post-event report to stakeholders, sitting alongside your usual lead count and stand traffic numbers.
Sponsorship and co-branding opportunities. At larger, multi-exhibitor events, a shared charging station — funded jointly by the organiser and one or more sponsors — can be positioned as a headline value-added service for the entire show, with sponsor branding rotating across an integrated screen or across multiple identical units placed at different points around the venue.
23. A Note on Accessibility and Inclusive Design
Good event planning always considers the full range of attendees, and a charging station is no exception.
- Position the lowest row of lockers, and any keypad or instructional text, at a height that is comfortably reachable for wheelchair users and visitors of shorter stature, rather than assuming a single “average” reach height for all users.
- Ensure any queuing area in front of the unit is wide enough for a wheelchair user to approach and use the unit without needing to reverse or navigate around other visitors.
- Where instructional signage is used, keep text large, high-contrast, and simply worded, supported by clear numbered icons or diagrams rather than relying on text alone.
- If your event attracts an international audience, consider whether instructional signage should be presented in more than one language, particularly for a shared, event-wide installation used by visitors from overseas.
24. Bringing It All Together
Across every example in this guide — the slim, elegant wall-mounted bank recessed flush into a plain corridor wall, the paired branded towers finished in deep corporate blue, the screen-topped units used by a global resources company, and the bold, open, non-locker charging bar used by a major online marketplace — the same underlying principle holds true: a phone charging station only delivers its full value when it is planned as a deliberate, branded, well-positioned feature of the stand, rather than treated as generic, unbranded infrastructure tucked away as an afterthought.
Get the fundamentals right — the right format for your wall structure or floor plan, the right locker type for your marketing objective, power and branding ordered early, and a team briefed to make the most of the resulting conversations — and a phone charging locker will consistently rank among the best-performing, best-value additions to any exhibition stand, turning a simple, universal need into one of the most effective footfall strategies available at any event.